Before we begin, I want to thank you for taking the leap and joining this free course. I’m so happy and excited for the journey you’re about to go on!
I also want to take a moment to let you know that the only difference between those that are successful with a blog and those that are not successful is the successful bloggers DO. They do it. They don’t wait until it is perfect. They don’t wait until everything is ready. They just do, and that is what I want to encourage you to do today.
Just start. Just get the hosting. Just pick a name. Just write the post. Just post on social media.
Starting a blog has been the best thing to happen to me and my family. With this platform, we are able to bring in extra income every single month to use toward paying down debt, travel, Christmas, and are now saving toward building our dream home on land that we have purchased.
If you’re tired of reading stories like this and want it to finally be YOUR TURN, make it your turn. Your blog doesn’t have to be perfect to be a success, but it does have to exist and it can’t exist until you finally do it.
Through your blog, you can make a positive impact on others. Whether you’re sharing personal stories, knowledge, or promoting a cause, your words have the potential to inspire, educate, and uplift your readers. This is exactly why I created this free course, so everyone has an opportunity to learn step by step how to start only a successful blog, but one that will bring in extra income for you as well.
During this course, I’m going to teach you how to start a blog from scratch with no prior experience needed! Take as long as you need to complete it, whether that means you work on it over the weekend or knock it all out in one day but remember JUST START.
I know you can do this, so let’s get started!
Also, if you found this guide beneficial, check out The Pinterest Playbook. It is my exact Pinterest strategy that helped really boost my blog and fast-track my success.
Disclosure: This page contains affiliate links.
What do you need to start a blog?
Starting a blog is pretty simple, even if all of this is completely new to you.
Here are the three main things you need to start a blog:
- A name for your blog (what your .com is going to be)
- Web hosting (this is what’s going to put your blog online for everyone to see)
- 30 minutes to actually get it started (this part is putting in all your info).
- An email address.
We are going to cover steps A through D all in day one so you’ll be completely set up with a blog at the end of this. The following days will focus on settings for your blog so it’s easy to navigate and how you can actually make money blogging.
Step 1: Let’s Start your blog
Name your blog:
The very first step in creating your blog is deciding what you want to call your blog. For me, this was the hardest step because there’s so many things my blog could be called. Also, I tend to overthink things.
To help you not get stuck on the first step, take the following into consideration when picking a blog name:
1.) Are you writing about a niche topic?
A niche is a very specific topic. For example, if you preserve food through canning and that is what you want to blog about, then canning food is your niche.
If you are going to be writing about a niche topic, then you want to include your niche in the name of your blog. Having your niche in your blog name will help when people perform searches about that topic, the name of your blog will show up in the search results.
Keeping with our canning example, a niche blog name would be something like foodcanningandpreservation.com.
2.) Are you going to be writing about a variety of topics?
If you are going to talk about a variety of topics, give your website a name that works with all the topics. Doing so, really means you can be as vague as you want. You don’t have to include a topic or niche into the title, but name it whatever calls to you.
Here are some examples of what that might look like:
ChasingFantasies.com (This could be for a lifestyle blog)
LifeWithThe(your last name)s.com
Ex: LifeWithTheWinchesters.com (I don’t know anyone with this last name other than Sam and Dean, but man I’d read this blog!)
(your first name)sjourney.com
Ex: SarahsJourney.com
Not only does this option for naming your blog give you flexibility in your name (you’re not tied to including your topic), but it also gives you room to grow. Leaving the topic of your blog out of the name allows you to expand without worrying about your website name.
I personally favor this method for first time bloggers for that exact reason, you may have an idea of what direction you want your blog to go in, but you truly never know where the future is going to take you.
Additional tips for naming your blog:
- Choose a .com over the other options, it looks more legitimate.
- Don’t misspell words. It will make it harder for people to search for your website, especially if you verbally tell them your blogs name, they won’t know the unique spelling and it will be hard for them to remember.
Take Action!
This is the section where I want you to actually do something before moving to the next step.
Action: Write your blog name down.
Remember to:
- Choose a .com over the other options, it looks more legitimate.
- Don’t misspell words.
- Include your niche (if you blogging about a niche topic)
- Have some backup options (incase your first choice is taken)
Web hosting for your blog:
Now that you’ve got your blog name sorted out, let’s talk about web hosting. To actually start a blog, you need hosting. A hosting company is what keeps your blog online and installs the software necessary for you to blog.
Using a hosting company makes blogging super easy, you do not have to know anything about web design or how the internet works. All you need to do is sign up, and you’re ready to get started blogging.
In the following steps, I’m going to go into detail about hosting and signing up for hosting so that by the end of the next few minutes, you will actually have a blog! It is now go-time, so make sure you can set aside the next 10 minutes to complete this process all in one sitting.
First, you are going to want to click here to open Bluehost in a new tab; this is going to be where you sign up for a blog. I am working with Bluehost to bring you a discounted price!
Be sure to click the link to sign up so you can get the best hosting around for bloggers and the absolute lowest price! Seriously, for less than $3 a month you can start your blog.
Click here to open Bluehost + get discount
Bluehost also has amazing customer service. I recently needed help with this blog and was able to get my issue resolved within minutes using their chat feature. No talking on the phone or having to email back and forth!
If you need some help covering the hosting fee, I wrote an entire post on how you can quickly earn that money online in about a week or less. You can read that here.
Also, if you sign up for Rakuten (you earn cash back for shopping online at places like Old Navy and Sam’s Club) though my link, they’re giving all new referrals $30 in cashback. That’s basically your hosting for an entire year! Here’s the link to sign up and take advantage of the offer.
Step-by-step guide with photos:
In another tab, you should have a page that looks like the image below; if you don’t, you can click here to open that page
Click “Get Started Now”

Now, you’ll see the page where you choose a hosting plan. You can choose any plan you want, but I suggest getting the “basic” plan because it comes with everything you need to start a profitable blog and is very affordable. It is what I used for my blog when I first started. You can always upgrade later.

After you click “select” on the Basic plan, you’ll be taken to the screen below:

If you know the domain name you want to use you can enter it in the “new domain” field. The “i have a domain name” field is if you have already purchased a domain name elsewhere and want to use it here. Once you’ve entered in your domain, click Next.
Then, you’ll go to the screen below where you’ll fill out all your demographic information:

For Business Name, you can put the name of your website without the “.com” at the end. For example, I put “Owls of Athena” as my business name.
Also don’t worry about creating a new email for your website before you sign up for Bluehost, no one is going to see this email but you and you shouldn’t get a bunch of spam emails from Bluehost so you don’t have to worry about that either.
However, be sure to remember what email you use because if you ever need tech support from Bluehost, you’ll need to know what email you entered here.
After you fill out your account information and scroll down you will see this:

I recommend signing up for a 36 month “account plan”, because it saves you the most money. You can change the length of your plan by adjusting the “Service Term” field.
There is only one “package extra” I recommend adding, which is “Domain Privacy Protection”. This makes it so that no one can access your personal information, if you decline this the first few days after starting your blog you may get a lot of phone calls. I purchased this and am so glad I did as I haven’t gotten one spam phone call about my blog. It really gives me peace of mind.
If you can’t afford Domain Privacy you can always just block the calls as they come in so those people cannot call you from that number anymore.
After you choose your plan, and package extras it’s time to pay. Enter your payment details and click submit.

After your payment processes, you will receive a confirmation screen letting you know everything went through. Next, it’s important to click “create account” so that you can access that blog you just created.
Next click “Create Password”. This will take you to a screen where you create a password for a Bluehost account. This is the password you will use to log into Bluehost to access your blog, so make sure you remember it and save it somewhere!
Click “Create Password” again, and then you will be taken to the page where you can finally login to that blog you just created!
It’s getting real! And it’s getting real exciting!
Click “Log In To WordPress” and you’ll go to a login page where you enter in all of your login info you just set up.

Once you login you will be prompted to create your website.
In this next step, you’ll answer a series of questions about what kind of blog you’re going to be starting. This helps Bluehost tailor some features for you. Click “Start Setup”.

Review the different options, but for this step I recommend that you select “Personal”.
Then click “continue set up”.

Next, you will be asked what your top priority is for your blog. Select “Publishing” then click “Next” in the top right corner. Publishing just means that you will be writing and creating content on your blog. Choosing this option doesn’t mean that you can’t sell anything on your blog or do other things with it later. Remember, these questions are for Bluehost to help you out, and how you answer these questions now won’t limit what you can do with your blog now or in the future.

After choosing “Publishing” you will be prompted to fill in details about your website. Don’t stress if you don’t have a name for your blog yet, or a description, or social media accounts. All these things can be added later once you get them set up.
I do suggest giving your blog just a short description, even if it is just a few words like “DIY and Lifestyle Blog”, but again don’t think too hard on this.
Once you’re done, click “Next” in the top right corner of the screen.

After you click “Next,” you’ll move on to Bluehost’s design setup for your blog. You can choose a design if you want and work through the setup, or you can just click “Next” in the top right corner until you get out of it. You can upload a theme after you finish the initial setup.
The next thing you’ll be asked about plugins. Select “Yes” for the following: JetPack, WP Forms, Monster Insights, and Yoast. You can choose more than I have listed here, but those are my recommendations, I don’t recommend any of the other options. Then click “Next”.

The last step to finishing your site is to click “Complete Setup”!

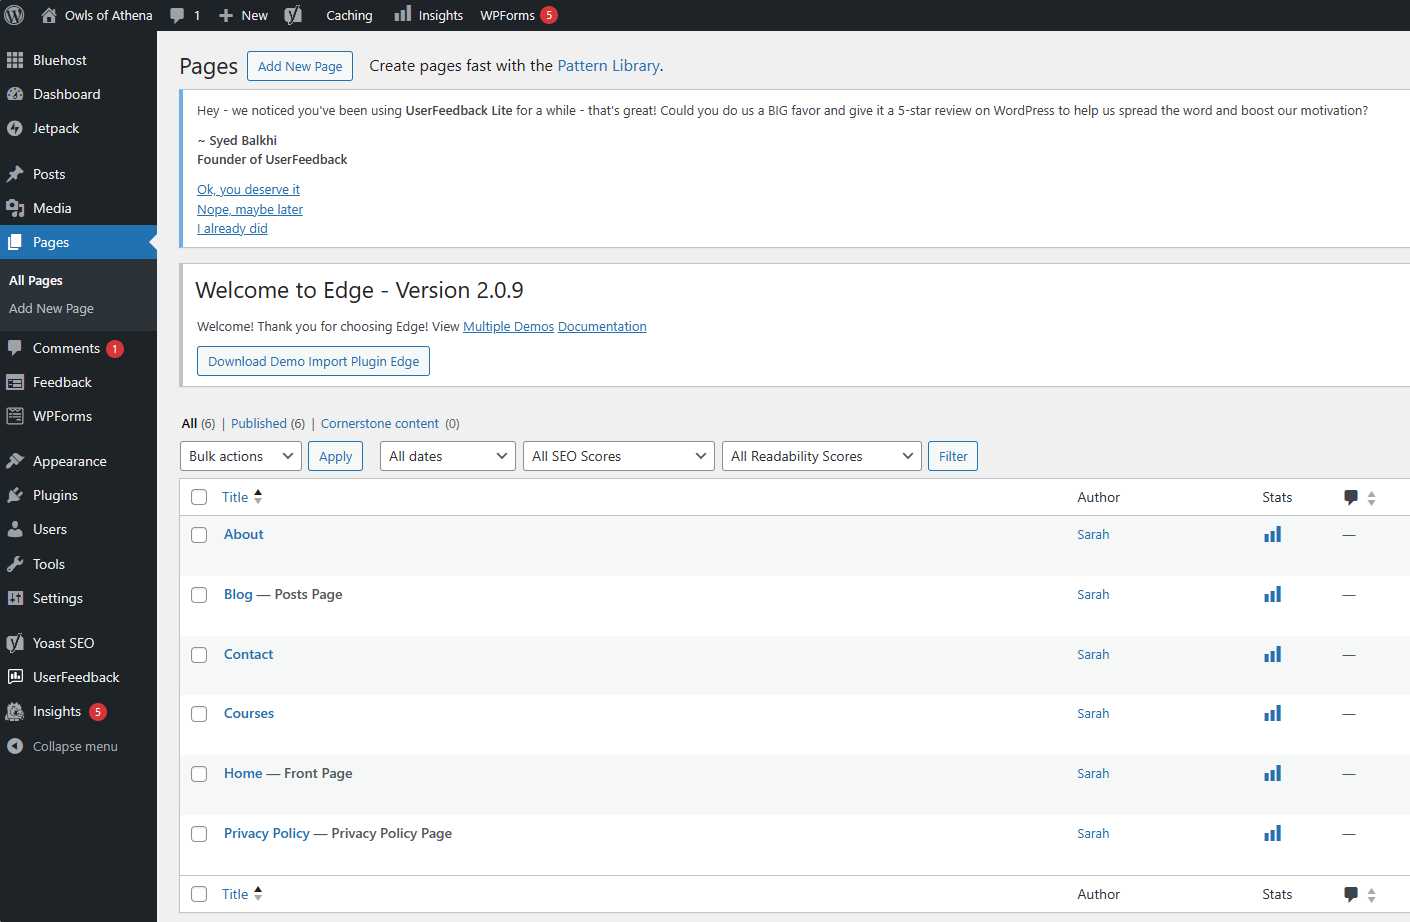
You’ll know your setup is complete when you see the main WordPress page like the image below. This is where you’ll go every time you login and this is where you do the real work on your blog, from creating pages to writing posts.

That’s it! You did it! You’ve officially got a blog, and you can start customizing your website, writing blog posts, and sharing your content!
In Step 2, we will go through clearing off your homepage (setting up the plug-ins) and getting your blog looking nice for readers. Feel free to stop here, or if you’re in the mood to keep going, just click on Step 2 below.
Step 2 – Settings Review and Installing a Theme
Welcome back! And thank you again for trusting me with this important step in your blogging journey.
Let’s get right back to it.
Now we are going to clean up the dashboard and learn our way around our new blog, getting everything ready for business.
Here are the topics we are going to cover:
- Navigate back to your blog and save it as your favorite/bookmark.
- Clearing your Dashboard.
- Pick and install a theme (remember you can always change/update/customize this later as your blog grows).
Navigating back to your blog:
The first time you need to get back to your blog can be kind of tricky, especially since this is all new. Follow the steps first to get back to your blog, and then follow the steps to create a bookmark so it is super easy to access your blog in the future.
- Login to Bluehost
- On the left side, click WordPress Hosting
- In the middle of the page, click Edit Site

Now that you’re back to your Dashboard, let’s save this as a bookmark.
- At the top of your web browser, click the star icon.
- In the location/Folder field, make sure it says Favorites or Favorites Bar.
- Click Done

Clearing Your Dashboard
Your Dashboard can be completely overwhelming when you first sign up and log in. Before we think about choosing a theme or design, we need to get all the “Welcome” messages cleared away, so you have a nice clean screen to work with and navigate.
First, make sure you are on your Dashboard. From the menu on the left side of the screen, click Dashboard.

Jetpack
- Locate Jetpack toward the top of your Dashboard, it should have a green header prompting you to set up Jetpack.
- Click the black “Set up Jetpack” button.

- Enter an email and password (use the same one you used for creating your blog).
- Do not purchase anything! Click the Back button on your browser until you get back to your WordPress dashboard.

- In the top right corner, click “x Dismiss”.

Monster Insights
Monster Insights connects with Google Analytics to give you information about all the traffic that is coming to your blog. This is a great tool to learn insights about your audience.
- Set up a Google Analytics account
- Go to https://analytics.google.com/
- Click Create Account
- Enter your Account Name (use your blog name)
- Enter your Industry (choose hobbies and leisure)
- Select your Business Size
- Choose how you intend to use Google Analytics
- For Business Objective, select “examine user behavior”
- Click Create
- Accept the Terms of Service and Data Processing Amendment
- Click Continue
- You don’t need to choose a platform, click Skip for now.

- Return to your dashboard and click “Please Connect Your Website to Monster Insights”.

- Select “Publisher”
- Click “Connect Monster Insights”
- Login to your Google Analytics account.
- Click “Complete Connection”
- Don’t change any of the settings and click “Save and continue” and then repeat and click “Continue”.
- Scroll down and click “Complete setup without upgrading”
You can always get back to your insights by clicking the insights button from the left sidebar.

Finishing up the Dashboard
We’re almost done clearing off the Dashboard, just a few things left to remove some of the clutter and finalize a few settings.
- Make sure you are on your Dashboard. Click “Dashboard” from the menu on the left side of the screen.
- Locate “First-time SEO configuration” and click the “X” to remove.
- Locate the large “Welcome to WordPress” message (it’s huge, can’t miss it) and click the “x Dismiss”.

- From the menu on the left, click “Plugins”
- Locate Askimet and click “Activate”
- Select “Plugins” again from the left menu and locate “All in One SEO” and click “Deactivate”
- Locate “Optin Monster” and click “Deactivate”

- From the left side menu, click “Dashboard”
- In the top right corner of the screen, locate where it says “Site Status: Coming Soon”
- Click the button that says “Screen Options”

This will open up an area at the top of your screen where a bunch of checkboxes are located. This feature allows you to turn on and off the different elements featured on your homepage.

- Ensure the following are selected:
- Monster insights
- Site Health Status
- At a Glance
- Activity
- Quick Draft
You can collapse the checkboxes by clicking “Screen Options” again, and of course if you ever need to get back to that area, just click the button.
Now that our Dashboard is set up and free of clutter, it will be so much easier to navigate these screens without all the overwhelming information constantly popping up in your face.
Don’t stress too much about what everything that we just did means. Since we’re just getting started, we only need to focus on getting your blog up and running, there will be plenty of time to explore and adjust settings as your blog grows, but right now that isn’t a priority because you don’t have any content yet.
Installing a theme for your blog:
You do not have to pay for a theme for your blog. This is an area where you can really save some money and it helps that these themes are free so you can get started right away.
There is nothing wrong with using a free theme. The theme I use on my blog now is a free one. Paying for a theme doesn’t make your blog successful, remember starting your blog, picking any theme, and posting is what is going to make you successful.
The theme I’m going to walk you through today is called Edge.
Inside WordPress on the left side click Appearance then click Themes.

Search for Edge. It should be the first theme that appears.
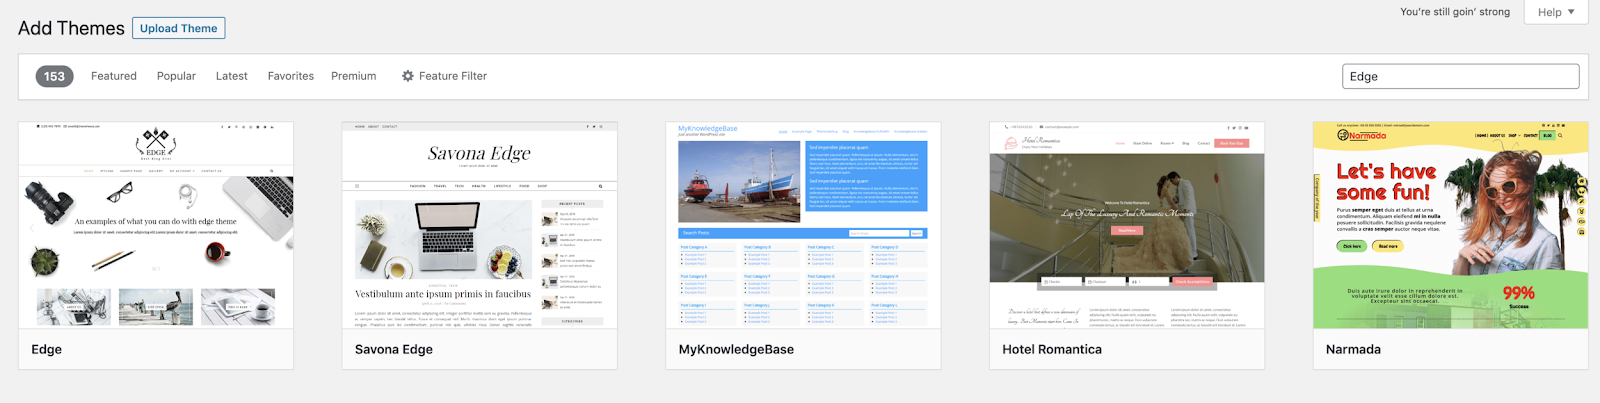
Hover over it and click Install. Then click Activate
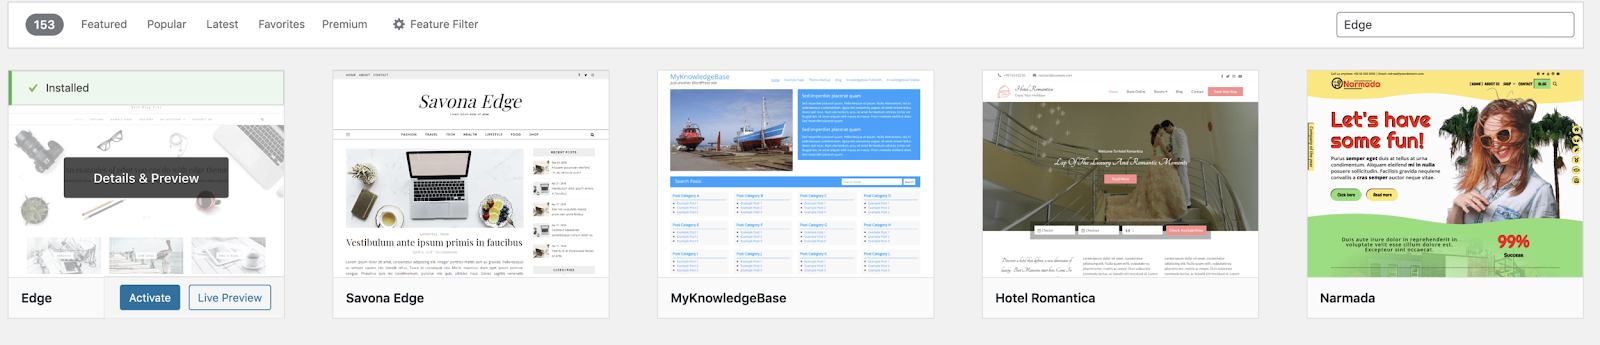
After you click Activate you will be brought to the theme page where you will see that the theme is installed and the Activate button changes to Customize. Once you click Customize, you’ll be able to make as many changes as you want with your themes. I love playing with and changing the colors.
Important Note
Any time you make changes to your blog make sure you click publish. If you don’t want those changes to show up for your readers yet, on the publish button there is a gear icon. When you click that gear icon one of the options is to Save Draft which will save all your changes without publishing for everyone to see.

Edge Customization Options
In this section, I’m going to go over the sections I recommend taking a look at and making changes if you want to. The other sections I never mess with and haven’t found a reason to yet.

Edge WordPress Settings: Update your blog title and logo, upload a header image, change the background of your blog to an image, and change your home page from displaying your latest blog posts to displaying a page instead.
In this section I want you to click Site Title & Logo. For your site title put your blog name but with spaces and remove the .com part. For your tagline, put your blog’s mission, such as “Helping new bloggers succeed”. Don’t stress over this too much because you can always change it when inspiration strikes you later. For now, just put the first thing that comes to mind.
Edge Theme Options: This is where you can change things that have to do with your blog’s layout, such as the pages that are featured on your home page, and your social media links that display on your blog. Play around with this until you find what works, but I do suggest adding your social media links if you have them. If you don’t, then don’t worry about it.
Edge Colors: You can change the colors of the links and buttons. Change this to match your brand. If you haven’t picked colors yet, pick something now and then use the same colors for emails, Pinterest pins, social media posts, etc. Using the same colors keeps everything consistent.
Menus: You can change the menu that appears at the top of your website.
Adding a Logo
- To add a logo to your blog go to Canva.com
- Search for “logo” in the search bar.
- Once you find one you like, click on it, then click Resize on the top left.
- Resize it to be 500 x 150 pixels.
- You’ll probably have to do some dragging to make it work for what you need and simple editing to include the name of your blog. Also, search around in the graphics to add or replace some elements.
- Download and save your logo.
- To upload it, login to WordPress and click Appearance then themes.
- For Edge, click Customize.
- Click Edge WordPress Settings then Site Title and Logo
- Upload your logo then scroll down to Site Logo/ Text Options and select Display site logo only.
- Publish your changes.
Adding a Favicon/Site Icon
- Go to Canva.com
- Search for “logo” in the search bar OR you can use the logo you just created.
- Once you find one you like or your own, click on it, then click Resize on the top left.
- Resize it to be 512 x 512 pixels.
- Download and save your logo.
- To upload it, login to WordPress and click Appearance then themes.
- For Edge, click Customize.
- Click Edge WordPress Settings then under Site Icon select Site Title and Logo
- Upload your logo then publish your changes.
Now that you have a blog and you installed a theme, you are ready to get started organizing the structure of your blog by adding categories, and the important pages every blog needs, which is all covered in Step 3. Feel free to stop here and take a break, but whenever you’re ready, move on to Step 3 below.
Step 3 – Creating Categories and Pages
Now that you have a blog and you installed a theme, you are ready to get started organizing the structure of your blog by adding categories, and the important pages every blog needs.
In this step we are going to talk about:
- Creating categories for your blog.
- How to create all the required pages for your blog and the information each should have.
- How to create a navigation menu for your blog to make it easier for your readers to find your content.
How to choose categories for your blog:
Define your blog’s niche.
Once you know your blog’s niche (which is basically the topic of your blog), you can start to create categories that fit within that niche. Having trouble with your niche? Then answer this: what is your blog about? What are you going to post about? Separate that into topics and then those are your categories.
For example, my categories include: courses, side hustles, and products I adore. Those are all things I post about on my blog.
Create categories are clear and concise.
Readers should be able to easily understand what each category is about. Avoid using jargon or technical terms that your audience might not understand. Also, avoid misspelling words when creating your categories and keep them to just one or two words. This will make your blog look professional and top tier.
Take Action!
Before you move past this paragraph, take a moment and write out your categories. My goal for you is to pick 2-5 different categories you think you will be writing about on your blog.
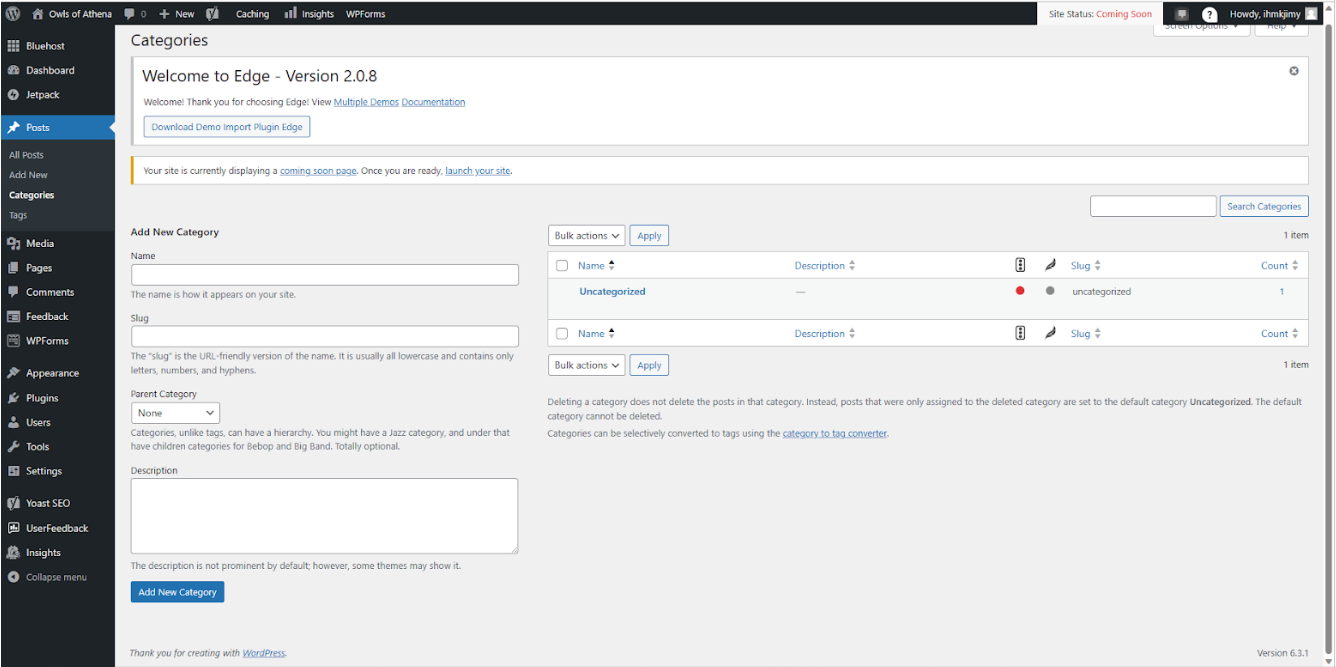
How you add your categories to your blog:
- Go to your WordPress Dashboard.
- From the left-hand menu, click Posts.
- Click Categories.
- In the Name field, type the name of your first category (entering a description for your category in the Description field is optional and not something I do).
- Click Add New Category.
- Repeat until all your categories have been created. You’ll begin to see each category you create on the right side of your screen.
Required pages for your blog:
- Home or Blog (you could do both)
- About
- Contact
- Privacy Policy
What happens if you don’t have these pages on your blog? Simply, it will self-destruct.
Kidding.
Required might be a little serious as it’s not really required to have these pages, but I really really really suggest you create them.
How to Create a New Page
Let’s talk about how to create a new page first, and then we’ll discuss what exactly you need to put into each page.
A page is not a blog post. In fact, you can have a page to house all of your posts, which is what I do, you can find all my posts under the Blog page on my site. A page is used to organize your content or house a specific type of content, such as your privacy policy or contact information.
Below are the steps to create a page:
- Go to your WordPress dashboard.
- On the left-hand menu, click Pages.
- In the top left corner, click the Add New button.
- In the Title field, enter a title for your page. For this example, type About.
- In the upper left side of the screen, click the Wonder Blocks button.
- A pop-up will open, click Templates.
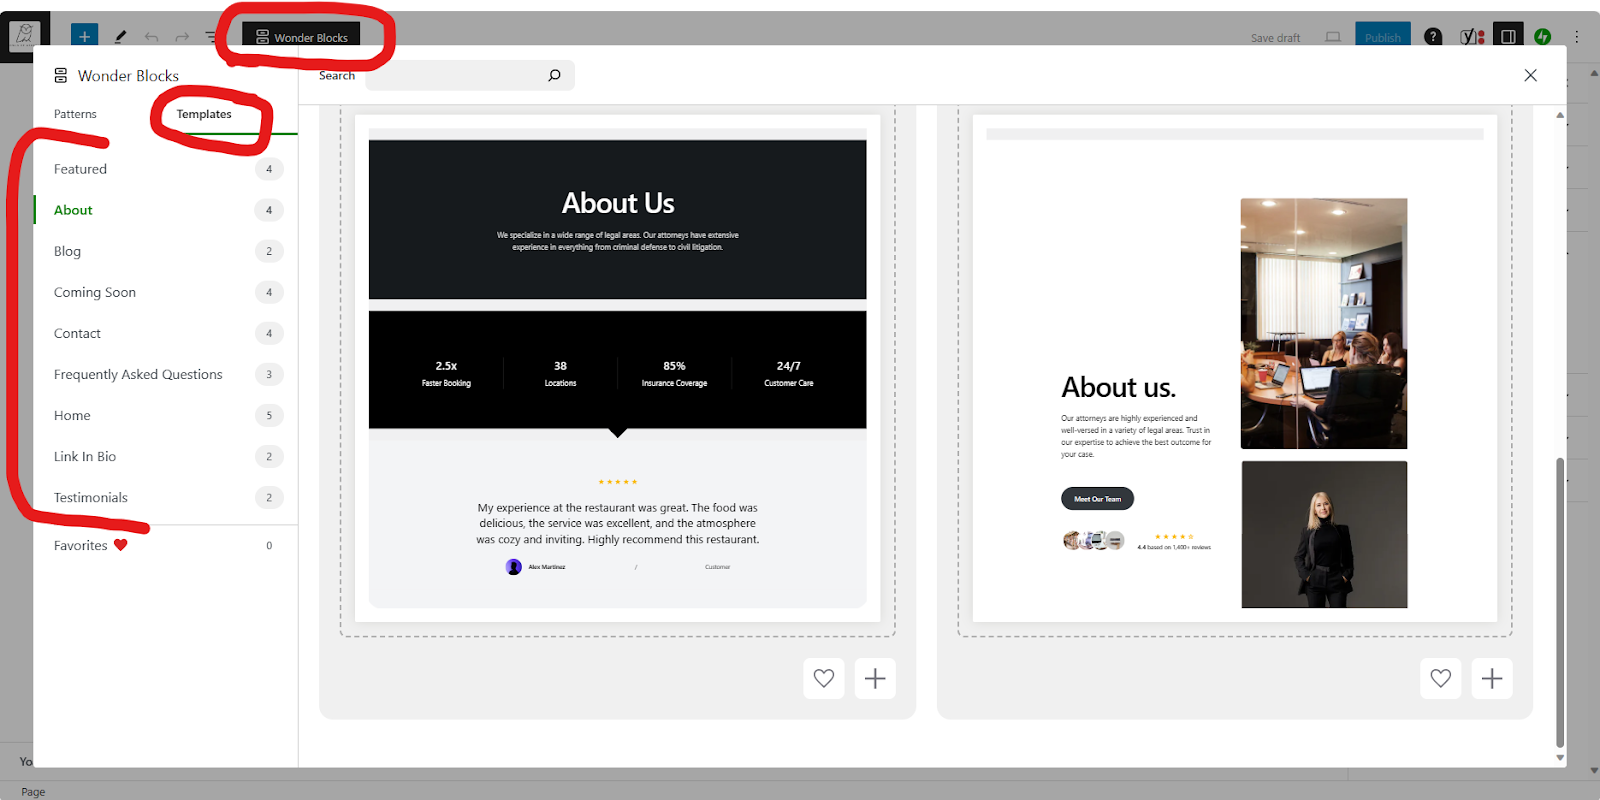
- You can use a template for pages, or just leave it simple with text only, or play around with the wonder blocks and build your own.
- To save your page, click Save Draft.
- To make your page go live, click Publish.
- Repeat for every page you need to create.
With your pages now created, let’s put some content in them. Below you’ll see a breakdown of each page and what you should include. Just click on the page and choose edit to add the needed content.
About
The about page is the only way your readers can get to know you when they visit your blog. People don’t trust people they don’t know so they will be less likely to buy from your affiliate links or continue to engage with your content if you don’t include a little bit of information about yourself. It’s proving to your audience that you are a real person.
Information to include on your About page:
- Name: The most important piece of information to include on your about page is your name. It’s your choice to include both your first and last name.
- Bio: I know it’s hard to talk about yourself sometimes, but this can be a very brief overview of your life and background. Talk about your interests, your passions, and be sure to include any credentials or education that is relevant to what you’re talking about on your blog. For example, I blog about creating courses and have a master’s degree in education and have been teaching in person and online for 10 years.
- Why: Why do you blog? Why did you finally say yes and take the leap to creating your own website? What are your goals for your blog? Stating your why and telling your story will help readers understand your motivation and connect with you on a deeper level.
As you gain experience and become successful with your blog, be sure to come back to your About page and update it. Include what goals you’ve achieved, new goals you’ve set, how your blog has changed your life. All of this will be motivational to your readers to pursue the same path you did.
Contact Page
The purpose of a contact page is to house your information so companies, readers, and potential sponsors can reach out to you about opportunities to work with you.
Your contact page should have:
- A short statement of what you’re open to work on. Example: “Thanks for visiting my page! I would love to work with you on sponsored posts or other collaboration opportunities.”
- If you offer services to your readers, such as courses, be sure to include a statement directed toward them and how to contact you for any questions they may have.
- A contact form or your email address.
- Links to your social media accounts.
Privacy Policy
A privacy policy and cookie policy are needed to protect you legally. The policies tell your readers what you do with their information.
You can generate a free privacy policy from these sites:
- https://www.privacypolicygenerator.info/
- https://wordpress.org/plugins/uk-cookie-consent/
- https://www.privacypolicies.com/blog/what-is-privacy-policy/
Home/Blog
It’s totally up to you whether to have this page be called Home or Blog. I have both because my Home page is like a landing page, it introduces my readers to the content they’ll find on my site. My blog page houses all the posts that I write.
To create a page for your posts to appear automatically, follow the instructions on adding a page above and from the Wonder Blocks Templates, choose Blog.
How to Create a Menu
Without a menu on your website, it will be really hard for your readers to navigate around. A menu allows your readers to easily find the information and posts that are important to them.
I recommend adding all of the categories and pages you made to your menu.
For most new blogs, your homepage will automatically have your blog posts on it, but if not you’ll also want to add your blog page to your menu.
Here are the steps on how to create a menu in WordPress:
- Go to your WordPress dashboard.
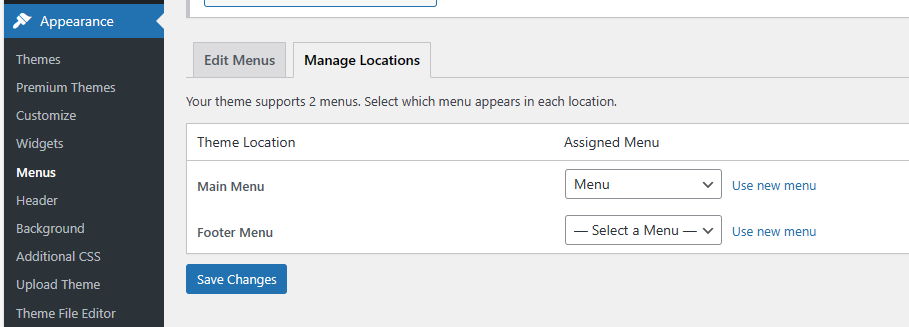
- On the left-hand menu, click Appearance.
- Click Menus.
- Click the Create a new menu button.
- In the Menu Name field, enter a name for your menu. I just went with Menu.
- Select a location for your menu from the Theme Locations dropdown menu. I chose Main Menu.
- Click on the Add Items button (within Edit Menus).
- Select the pages, categories, or custom links that you want to add to your menu.
- Click on the Add to Menu button.
- Drag and drop the menu items to rearrange them.
- Click on the Save Menu button.
And with that your blog is officially set up! Congratulations! You have a blog!
In step 4 we talk about posting, how to write a post and some do’s and don’ts when it comes to making posts.
Continue to step 4 whenever you’re ready!
Step 4 – Writing the First Post
Now that your blog is officially set up, it’s time to start posting and creating content. You won’t be able to earn money from your blog until you have content for readers to view and click on.
First, I’m going to give you the steps to creating a post in WordPress and then we will talk about some important things to consider when writing your posts.
How to Create a New Post in WordPress
- Go to your WordPress dashboard.
- On the left-hand menu, click Posts.
- Click on the Add New button.
- Enter a title for your blog post in the Title field.
- Select a category for your blog post from the Category dropdown menu (note that adding tags to your post is completely optional).
- To add a featured image to your blog post, click the Set Featured Image button.
- Write your blog post in the main content area.
- Use the Wonder Blocks button above the content area to format your text, add images, videos, and other media, and insert links.
- Publish your blog post immediately or schedule it to be published later by clicking on the Publish button.

Take Action!
Go ahead and complete the steps above and get one post created, you don’t need to write anything yet, but instead of clicking Publish, click Save Draft. To get back to your Posts (published or pending) you just go back to the Posts section in your Dashboard.
Next, let’s talk about some things to think about when you’re writing posts for your blog. You’re the context expert so I can’t tell you WHAT to write because it’s your blog! But, there is a way to make sure you’re creating the best content for your readers.
Here are five things to consider when writing a blog post:
- Target Audience:
- Who are you writing for? Who do you want to read this post? Identify your target audience before writing. Understand their interests, preferences, and needs. Tailor your content to resonate with them, ensuring relevance and engagement. Always keep your audience in mind when posting. For example, if you are running a food blog, making fashion posts might be out of place with your readers.
- Compelling Headline:
- Craft a captivating headline that grabs attention and conveys the essence of your blog post. A compelling headline encourages readers to click and explore further. This can be difficult, especially if you’re new to writing. The best tip I can give for this is to go to one of your favorite websites and look at the titles of their articles. Or go on Instagram and look at the feeds of E News or NY Times and see the type of words they use to get you to click on the post or article.
- Clear Structure and Formatting:
- Organize your blog post with a clear structure. Use headings, subheadings, and bullet points to enhance readability. A well-formatted post is more likely to be read and shared.
- Engaging Content:
- Create content that is informative, interesting, and adds value to your audience. Include anecdotes, examples, or relevant data to make your blog post more engaging and memorable. You don’t have to constantly be reinventing the wheel every time you post, but stay current on trends and new media.
- SEO Optimization:
- Optimize your blog post for search engines. Use relevant keywords, meta descriptions, and alt tags for images. SEO-friendly content improves visibility, making it easier for your audience to find your blog. Don’t think SEO only applies to your post title. You’ll notice along the sides of the post creation area there is a place for SEO and meta tags. Explore those areas and also use your keywords in the post you are writing.
Now get to writing! Don’t forget that you can add images to your posts to help convey what you’re writing about. If you Google “free stock photos” there are a ton of websites available.
Remember to revisit your old blog posts every now and then to keep them updated. You can state the update at the top, or just make the changes as need.
Listen to me: it’s not going to be perfect. Especially the first. Such is life, right? But really, stop waiting and just go for it. Type the words and click Publish. If you don’t do it you’ll never know.
This is the last step in this course. You did it! You have a blog! Now it is up to you to continue to put in the work. Don’t overwhelm yourself, just doing a little bit every day will help you reach your goals. If you have questions, please don’t hesitate to reach out to me! I mean it when I say I’m excited for you and the journey you’re starting with your blog, and I am here to help.
I also want to take a moment to tell you about The Pinterest Playbook. I created this step-by-step guide on how to drive traffic to your site or product with Pinterest. It is my exact Pinterest strategy and is set up so all you have to do is copy/paste my method to start seeing results immediately.
Happy blogging!